Build on Windows
Building OrcaSlicer for 64-bit Windows. build_win.bat installs the prerequisites and builds both the dependencies and the slicer. MSVC is the default toolchain, and clang-cl (LLVM) is supported as an alternative.
- Tools Required
- Hardware Requirements
- Get the Source
- The Build Script
- Build the Dependencies
- Building with MSVC
- Building with clang-cl
- Troubleshooting
Tools Required
Tip
Once the repository is cloned, build_win.bat --install-vs ide installs all of these. See The Build Script.
-
Visual Studio 2026, 2022, or 2019 16.8 or newer, with the Desktop development with C++ workload
Important
A plain winget install of Visual Studio installs the IDE without any C++ compiler, and the build fails later with CMake unable to find a Visual Studio instance. The --override flags above add the required Desktop development with C++ workload.
If Visual Studio is already installed without it, add the workload from Visual Studio Installer -> Modify -> check Desktop development with C++ -> Modify.
Important
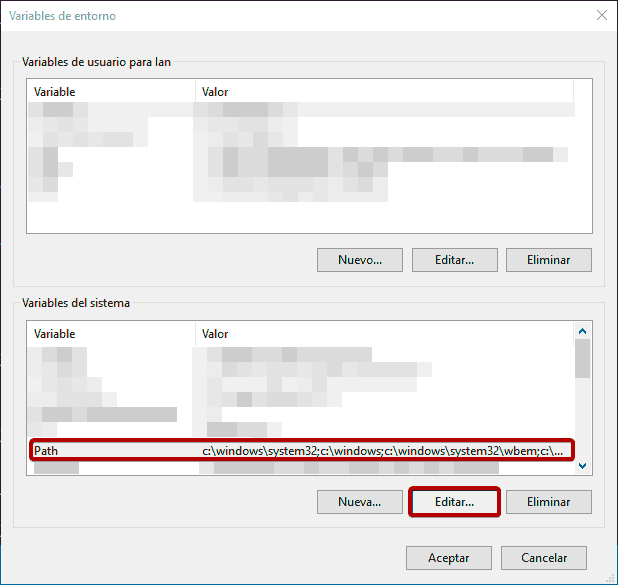
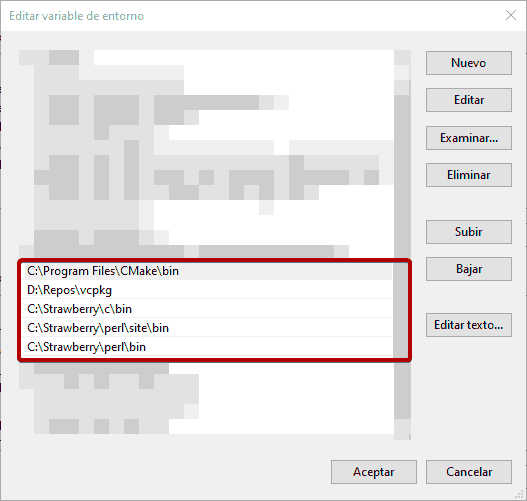
Strawberry Perl bundles its own CMake. If it comes first on PATH, cmake --version reports that copy rather than the one you installed. Run where cmake to list the active copies, then reorder System Environment Variables > Path so the real one wins:
OrcaSlicer needs CMake 3.13 or newer, and 3.21 or newer for the clang-cl presets below. CMake 4.x is fine. build_win.bat skips Strawberry's copy for its own runs, so this only affects CMake invoked directly.
Tip
GitHub Desktop is optional and gives you a GUI for repository and branch management:
Hardware Requirements
- Minimum 16 GB RAM
- Minimum 23 GB free disk space
- 64-bit CPU
- 64-bit Windows 10 or later
Get the Source
Clone the repository, either from GitHub Desktop or on the command line:
Nothing below needs a developer command prompt. Change into the clone:
The Build Script
build_win.bat in the repository root builds the dependencies and the slicer. It runs from any shell and any directory, and sets up the Visual Studio environment itself.
It installs the tools listed above, Visual Studio included, with the components a build actually needs:
Use buildtools in place of ide for the Build Tools without the IDE, and add -l to include the clang toolset. Restart the shell afterwards so the new PATH applies. build_win.bat -u installs only CMake, Perl and Git.
build_win.bat --help lists every option. The ones that come up most:
| Option | What it does |
|---|---|
-d, -s |
Build the dependencies, build the slicer. -ds does both. |
--config <name> |
release (default), debug, relwithdebinfo or minsizerel |
-l, -x |
Compile with clang-cl, generate with Ninja Multi-Config |
--tests |
Build the unit tests alongside the slicer |
--run-tests |
Build them and run them |
--slicer-target <name> |
Build one target instead of everything |
--no-configure |
Skip the configure step when only sources changed |
--no-gettext |
Skip regenerating the translations |
-j <n> |
Cap the number of parallel compilers |
-c |
Delete the directories this run would build |
--cache <tool> |
Compile through a compiler cache, needs -l -x |
-D |
Print every command instead of running it |
Build directories are named for the configuration, compiler and architecture that made them, so changing any of the three configures a new directory instead of reusing one built another way:
| Build | Slicer directory | Dependency directory |
|---|---|---|
| MSVC, Release | build\ |
deps\build\ |
| MSVC, Debug | build-dbg\ |
deps\build-dbg\ |
| MSVC, RelWithDebInfo | build-dbginfo\ |
deps\build\ |
| clang-cl, Release | build-clang\ |
deps\build-clang\ |
--arch arm64 adds -arm64 to both names. --build-dir and --deps-dir override either one, so a build can share dependencies with another checkout. Every run ends with a block naming what it produced and the commands to carry on with.
Build the Dependencies
Every slicer build links a matching set of dependencies, and each set is built once. Start with the release set:
This one installs into deps\build\OrcaSlicer_dep\usr\local.
Debug builds link the debug C runtime (/MDd), which cannot be mixed with the release one, so they need a separate set:
Those install into deps\build-dbg\ and are required for a Debug build under either toolchain. Release, RelWithDebInfo and MinSizeRel all link the release set.
Tip
clang-cl targets the MSVC ABI, so it links against the MSVC dependencies. -d -l -x builds a second copy in deps\build-clang\. Point --deps-dir at an existing MSVC one to skip that build:
Building with MSVC
MSVC with the Visual Studio generator is the default, and the toolchain CI uses.
-
Build OrcaSlicer:
-
Open the generated solution. The block at the end of the build names it:
-------------------------------------------------------------
Build completed in 0h 33m 4s
  OrcaSlicer    C:\src\OrcaSlicer\build\src\Release\orca-slicer.exe
  Solution      C:\src\OrcaSlicer\build\OrcaSlicer.slnx

Next
    Run it                build\src\Release\orca-slicer.exe
    Open in Visual Studio build\OrcaSlicer.slnx
    Rebuild after edits   build_win.bat -s --no-configure
-------------------------------------------------------------
Visual Studio 2026 writes
OrcaSlicer.slnxand the releases before itOrcaSlicer.sln. -
Set the build configuration to
Releaseand run the Local Windows Debugger.
-
The executable is written to:
For a Debug build, build the debug dependencies first, then:
That writes build-dbg\src\Debug\orca-slicer.exe and finds deps\build-dbg on its own, because both directories are named for the configuration.
build_win.bat -s --run-tests builds the test suites and runs them. See How to Test for more.
Note
The first build of any branch is slow. After that, changes to .cpp files compile quickly and changes to .hpp files take longer depending on how widely the header is included. Switching branches back and forth also forces a long rebuild even when nothing else changed.
Building with clang-cl
OrcaSlicer also builds with the clang-cl (LLVM) toolchain and the Ninja generator. It compiles the project considerably faster than MSVC on the same machine, which is the main reason to use it. Official builds and CI use MSVC, so a change still has to compile there.
build_win.bat -l -x needs nothing beyond the tools below; see Command Line. The preset file after it is for building and debugging inside Visual Studio or VS Code.
Additional Tools
clang-cl needs the clang toolset on top of the Desktop development with C++ workload. build_win.bat installs it:
That adds the C++ Clang Compiler for Windows component, which puts clang-cl.exe and lld-link.exe under VC\Tools\Llvm\x64\bin. To add it by hand instead, go to Visual Studio Installer -> Modify -> Individual components and search for Clang.
Ninja comes with Visual Studio, and build_win.bat finds that copy. VS Code and a bare cmake --preset run need their own on PATH:
Note
The separate MSBuild support for LLVM (clang-cl) toolset component (Microsoft.VisualStudio.Component.VC.Llvm.ClangToolset) drives clang-cl through the Visual Studio generator, as build_win.bat -l without -x does. The Ninja setup below does not use it.
The Preset File
Visual Studio, VS Code and cmake --preset all read the same CMake preset file. Create CMakeUserPresets.json in the repository root:
{
  "version": 3,
  "configurePresets": [
    {
      "name": "x64-clang",
      "displayName": "x64 Clang",
      "description": "Matches build_win.bat -s -l -x --tests (build-clang), plus RelWithDebInfo and MinSizeRel in the same directory",
      "generator": "Ninja Multi-Config",
      "binaryDir": "${sourceDir}/build-clang",
      "architecture": { "value": "x64", "strategy": "external" },
      "toolset": { "value": "host=x64", "strategy": "external" },
      "environment": {
        "NINJA_STATUS": "[%f/%t %p :: %w / %W] "
      },
      "cacheVariables": {
        "CMAKE_C_COMPILER": "clang-cl",
        "CMAKE_CXX_COMPILER": "clang-cl",
        "CMAKE_CONFIGURATION_TYPES": "Release;RelWithDebInfo;MinSizeRel",
        "ORCA_TOOLS": { "type": "BOOL", "value": "ON" },
        "BUILD_TESTS": { "type": "BOOL", "value": "ON" }
      },
      "vendor": {
        "microsoft.com/VisualStudioSettings/CMake/1.0": {
          "hostOS": [ "Windows" ],
          "intelliSenseMode": "windows-clang-x64"
        }
      }
    },
    {
      "name": "x64-clang-debug",
      "displayName": "x64 Clang Debug",
      "description": "Matches build_win.bat -s -l -x --tests --config debug (build-dbg-clang)",
      "generator": "Ninja Multi-Config",
      "binaryDir": "${sourceDir}/build-dbg-clang",
      "architecture": { "value": "x64", "strategy": "external" },
      "toolset": { "value": "host=x64", "strategy": "external" },
      "environment": {
        "NINJA_STATUS": "[%f/%t %p :: %w / %W] "
      },
      "cacheVariables": {
        "CMAKE_C_COMPILER": "clang-cl",
        "CMAKE_CXX_COMPILER": "clang-cl",
        "ORCA_TOOLS": { "type": "BOOL", "value": "ON" },
        "BUILD_TESTS": { "type": "BOOL", "value": "ON" }
      },
      "vendor": {
        "microsoft.com/VisualStudioSettings/CMake/1.0": {
          "hostOS": [ "Windows" ],
          "intelliSenseMode": "windows-clang-x64"
        }
      }
    }
  ],
  "buildPresets": [
    { "name": "x64-clang-release",        "configurePreset": "x64-clang", "configuration": "Release" },
    { "name": "x64-clang-relwithdebinfo", "configurePreset": "x64-clang", "configuration": "RelWithDebInfo" },
    { "name": "x64-clang-minsizerel",     "configurePreset": "x64-clang", "configuration": "MinSizeRel" },
    { "name": "x64-clang-debug-build",    "configurePreset": "x64-clang-debug", "configuration": "Debug" }
  ],
  "testPresets": [
    {
      "name": "x64-clang-test-release",
      "configurePreset": "x64-clang",
      "configuration": "Release",
      "output": { "outputOnFailure": true }
    },
    {
      "name": "x64-clang-test-relwithdebinfo",
      "configurePreset": "x64-clang",
      "configuration": "RelWithDebInfo",
      "output": { "outputOnFailure": true }
    },
    {
      "name": "x64-clang-test-debug",
      "configurePreset": "x64-clang-debug",
      "configuration": "Debug",
      "output": { "outputOnFailure": true }
    }
  ]
}
x64-clang uses Ninja Multi-Config, so one build directory holds Release, RelWithDebInfo and MinSizeRel. Switching between them needs no reconfigure. x64-clang-debug is separate because it links the Debug dependencies.
Neither preset sets CMAKE_PREFIX_PATH. CMake derives the dependency directory from the name of the build directory, so build-clang finds deps\build-clang and build-dbg-clang finds deps\build-dbg-clang. Those are the names build_win.bat -l -x uses, so the presets and the script share build directories and neither reconfigures what the other built.
All four configurations carry symbols, since SLIC3R_MSVC_PDB adds /Zi to every MSVC build by default. Optimization is what makes Release and MinSizeRel awkward to step through, with inlined frames and variables the debugger cannot show, so switch to RelWithDebInfo when you need to debug.
Tip
BUILD_TESTS is ON so the test suites build alongside the application, and the test presets can run them. Set it to OFF for slightly faster builds if you do not need them. See How to Test.
Tip
Four more entries in cacheVariables build these presets through a compiler cache, so the IDE and build_win.bat reuse each other's work. See Compiler Caching.
Tip
On Ninja 1.12 or newer, changing NINJA_STATUS to "[%f/%t %p :: %w / %W] " adds elapsed time and an ETA to each line:
Visual Studio
- Open the repository as a CMake project: File > Open > Folder. Do not open
build\OrcaSlicer.slnx, which is the MSVC solution. - Pick a build preset in the Configuration dropdown,
x64-clang-releasefor instance. Visual Studio labels that dropdown Configuration, but its entries are build presets, and each one names a configure preset and a configuration together, so it is the only thing to set. - Set the startup item to the
orca-slicer.exeentry whose path matches that preset,src\Release\orca-slicer.exeforx64-clang-release. Visual Studio defaults to a different executable and remembers your choice from then on. Do not pick either(Install)entry. -
Build with Build > Build All. The executable is written under the preset's build directory, so
x64-clang-releasegives: -
Run the tests with Test > Run CTests for OrcaSlicer once they are built.
Note
x64-clang-debug-build uses a single-configuration generator, so it has no per-configuration subdirectory. Its startup item is src\orca-slicer.exe and the executable lands in build-dbg-clang\src\orca-slicer.exe.
Note
Visual Studio may show a Build failed prompt on the first build even though the build succeeded and the application runs. Choosing to continue starts it normally, and later builds do not prompt. Check the Output pane instead of the dialog. A real failure names a file, and a failed configure step produces the same dialog.
VS Code
Requires the CMake Tools extension (ms-vscode.cmake-tools). It switches to preset mode on its own once CMakeUserPresets.json exists, so there is nothing to configure.
Open the CMake panel from the Activity Bar and set the entries under Project Status:
- Configure to
x64 Clang - Build to the configuration you want,
x64-clang-releasefor instance - Test to
x64-clang-test-release - Launch and Debug to
OrcaSlicer_app_gui, both of which default toall. Pick the entry undersrc\Release\, notOrcaSlicer_app_gui (Install)
The build preset carries the configuration, so switching between Release, RelWithDebInfo and MinSizeRel means switching build preset. The same entries are on the Command Palette under CMake: Select Configure Preset and CMake: Select Build Preset.
The Launch and Debug entries in that panel run the selected target directly. To debug with F5 instead, add a launch configuration to .vscode/launch.json:
{
  "version": "0.2.0",
  "configurations": [
    {
      "name": "OrcaSlicer",
      "type": "cppvsdbg",
      "request": "launch",
      "program": "${command:cmake.launchTargetPath}",
      "args": [],
      "cwd": "${command:cmake.launchTargetDirectory}",
      "stopAtEntry": false,
      "console": "internalConsole"
    }
  ]
}
cppvsdbg is the Windows debugger and reads the PDBs clang-cl produces. The ${command:cmake...} values follow the active launch target and build preset, so nothing is hard-coded. cwd starts the application next to the resources junction it needs.
Important
Without that configuration, Run > Start Debugging offers to generate one and suggests C++ (GDB/LLDB), which targets MinGW and LLDB. The template it writes debugs a single source file and fails with Variable ${fileDirname} can not be resolved.
Command Line
build_win.bat -l -x builds with clang-cl and Ninja without a preset file, from any shell and with no developer command prompt:
That builds deps\build-clang\ and build-clang\, and writes:
To build through the presets instead, from the x64 Native Tools Command Prompt for VS, which puts clang-cl, lld-link and the Windows SDK on PATH:
cmake --preset x64-clang
cmake --build --preset x64-clang-release
ctest --preset x64-clang-test-release
The executable is written to:
Troubleshooting
Dependencies
Tip
Some changes are not picked up by a rebuild because they live in the prebuilt dependencies, not in the OrcaSlicer sources. Rebuild the affected dependency on its own instead of everything under deps/.
For example, after modifying wxInspector:
The dependency set follows your toolchain flags, so add -l -x to rebuild the one in deps\build-clang. Then rebuild the slicer so the updated dependency is linked in.
Tip
A dependency build that fails with patch does not apply is being patched twice, and git apply cannot apply a patch to sources that already carry it. Rebuild that set from scratch:
-c removes the directory this run would build, so it clears the one matching your --config and toolchain flags.
Tip
A failed run ends by naming the command that broke and suggesting a -c retry scoped to the stage that failed. To discard both the dependencies and the slicer and start over:
Tip
If the build fails while configuring ZLIB, uninstall ZLIB from your Vcpkg library.
Windows SDK
Tip
If the Fix model option is missing from an object's context menu, the build did not pick up the Windows SDK. To fix it:
- Locate the
winrtfolder in your Windows SDK installation, for example:
The exact path varies with your Windows SDK version.
-
Open the libslic3r_gui project properties and go to Configuration Properties > C/C++ > Preprocessor > Preprocessor Definitions. Add
HAS_WIN10SDK. -
Open the OrcaSlicer_app_gui project properties and go to Configuration Properties > C/C++ > General > Additional Include Directories. Add the path to the
winrtfolder from step 1. -
Build the solution.
clang-cl
Tip
When a clang-cl build misbehaves, check which compiler it used. build_win.bat prints that before the build starts:
Compiler: C:/Program Files/Microsoft Visual Studio/2022/Community/VC/Tools/Llvm/x64/bin/clang-cl.exe
That is the one from Visual Studio unless --clang-path says otherwise, so a standalone LLVM cannot be picked up by accident.
The presets are a different case. They resolve a bare clang-cl through PATH, and the developer command prompt appends the Visual Studio LLVM directory to the end of PATH, so an installation like C:\Program Files\LLVM\bin wins. An old one fails the compiler check before anything is compiled:
-- The C compiler identification is Clang 11.0.0 with MSVC-like command-line
-- Check for working C compiler: C:/Program Files/LLVM/bin/clang-cl.exe - broken
lld-link: error: undefined symbol: __guard_eh_cont_table
Run where clang-cl to list the active copies. Then either put the Visual Studio directory first in System Environment Variables > Path, or replace the bare clang-cl in the preset's environment block with a full path.
Tip
Dependencies built by an older checkout fail under clang-cl in two ways.
TBB was compiled with /GL, and lld-link rejects LTCG objects. This surfaces late, at the Linking CXX shared library src\OrcaSlicer.dll step, as one error per object with no file or line:
lld-link: error: tbb.dir\Release\queuing_rw_mutex.obj: is not a native COFF file. Recompile without /GL?
wxWidgets installs its libraries under vc_x64_lib, but its own CMake config file looks for a clang_x64_lib directory when the compiler is clang-cl. This fails at configure time, with an include could not find requested file error naming clang_x64_lib/wxWidgetsTargets.cmake.
Rebuilding the clang dependencies from scratch fixes both:
To rebuild only TBB, delete deps\build-clang\dep_TBB-prefix first so its stamp files go with it, then name the one target: