Texture Displacement UV Editor
Important
NEW FEATURE: Texture displacement
Available in: Nightly builds or Releases greater than 2.4.2.
Every other Texture Displacement mapping guesses how to wrap the image onto the surface - from three axes, around a centre, or from the camera. Unwrap (LSCM) does not guess: it flattens the painted area into pieces that lie flat, and maps the texture onto those. That is what makes it the only mapping with no stretching surprises, and the only one that asks you to make decisions.
The UV Editor is where those decisions are made. Choose Unwrap (LSCM) as a layer's mapping and the pane opens beside the 3D view.
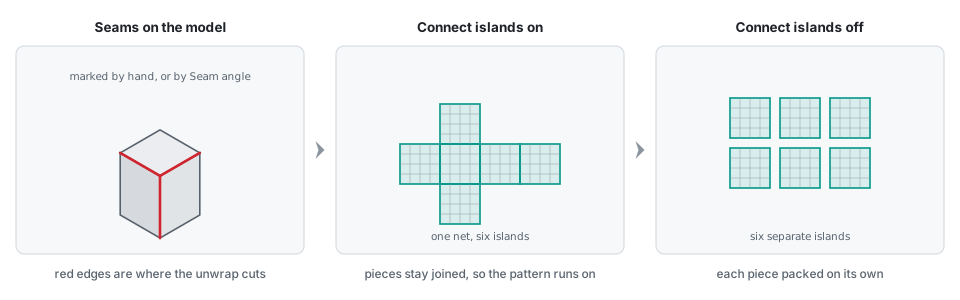
A surface cannot be flattened without cutting it - a cube has to be cut into a net before it lies flat. The cuts are seams, the flattened pieces are islands, and the whole job is deciding where to cut and how to arrange what falls out.
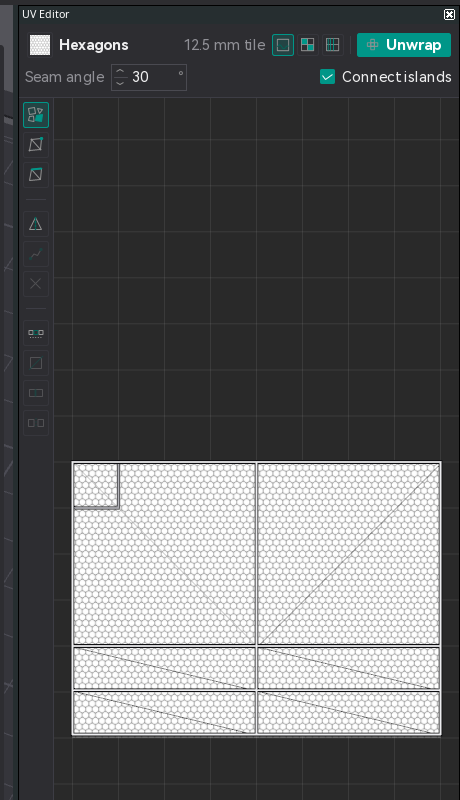
The pane itself: the layer and its tile size along the top, the seam and layout settings under them, the tools down the left, and the flattened islands over the layer's own texture.
The workflow
- Paint the area on the model, as for any other mapping.
- Set the layer's mapping to Unwrap (LSCM). The pane opens.
- Press Unwrap. The painted area is cut at its sharp edges and flattened.
- Look at the result in Checker or Distortion. If a piece is badly stretched, mark a seam through it and unwrap again.
- Arrange the islands if you want the pattern somewhere specific, then bake from the main panel.
Until a layer is mapped with Unwrap the pane says No layer mapped with Unwrap, and until something is painted it asks you to paint the area first.
Unwrapping
Unwrap computes the layout. Two settings decide what it produces, and both take effect at the next unwrap:
| Setting | What it does |
|---|---|
| Seam angle | Edges sharper than this are cut, and the pieces either side are flattened separately. Lower it to cut more: each piece then lies flat with less stretching, at the cost of the pattern not running continuously across the cut. Once you mark any seam by hand, your seams define the pieces and this is ignored |
| Connect islands | Lays the result out as a connected net - pieces that share an edge are unfolded next to each other, so a cube becomes a joined net rather than six loose squares. They are still separate islands and can still be moved by hand. Turn it off for a plain packed layout |
A summary along the bottom reports how many islands and faces came out. If the paint, the seams or the seam angle change afterwards, the pane marks the layout out of date - press Unwrap again.
Note
Re-unwrapping re-cuts and re-places every island, so placements you made by hand before it are discarded. Get the seams right first, arrange second.
Seams
Seams are edges the unwrap is forced to cut along, on top of whatever the seam angle cuts. They are how you decide exactly where the pattern is allowed to break - put them where a break will not be noticed: an inside corner, the back of a part, a line that is already a feature.
| Control | What it does |
|---|---|
| Mark seams | Click edges on the model to cut along them. The edge under the cursor is highlighted yellow; click to mark it red, click a red edge again to unmark it. Painting is paused while this is on |
| Path | Instead of clicking every edge, click a start point and then an end point - the whole shortest path between them is seamed at once, and each further click continues from the last point. Indispensable on a dense mesh |
| Clear seams | Removes every seam on this layer |
Hold Ctrl and drag to move the camera while marking.
Arranging islands
Three modes decide what a drag moves:
| Mode | Edits |
|---|---|
| Island | Whole islands - move, rotate, scale |
| Vertex | Single vertices, to reshape an island |
| Edge | Island edges, to reshape an island |
Shift or Ctrl with a click adds to or removes from the selection, and a drag then moves everything selected together. The model updates as you drag, so you can see where the pattern lands.
Clear UV edits discards manual vertex and edge moves and returns the unwrap to its automatic shape.
Checking for stretch
An unwrap flattens a curved surface, and flattening always distorts something. Two backgrounds make the distortion visible - they also colour the model in the 3D view, so you can judge it in both places at once.
| Background | Reading it |
|---|---|
| Height map | The layer's own texture under the islands, tiled exactly as it will bake. What you will actually get |
| Checker | A test grid. Squares that stay square are undistorted; squares stretched into rectangles mark where the pattern will be drawn out |
| Distortion | Each island coloured blue to red by how much it is stretched relative to the rest |
If an island is badly stretched, it is being asked to lie flat when it cannot. Mark a seam through it and unwrap again - more cuts mean less stretch.
Tools
| Tool | What it does |
|---|---|
| Average scale | Gives every island the same texel density, so one scaled by hand can be matched back to its neighbours |
| Cut | Splits the selected island across its long axis - for a long, curved island that cannot lie flat in one piece |
| Join | Unfolds the selected island onto its nearest neighbour along their shared edge. Both stay separate islands |
| Unjoin | Sends the selected island back to its own packed position |
| Snap | Sticks islands together when you drag one against another |
| Frame | Frames all islands in the pane |
Navigation and shortcuts
| Input | Action |
|---|---|
| Left-click | Select |
| Shift or Ctrl + left-click | Add to or remove from the selection |
| Left-drag | Move the selection |
| Right-drag | Rotate the selected island |
| R | Rotate with the mouse; click or Enter confirms, Esc cancels |
| S | Scale with the mouse; click or Enter confirms, Esc cancels |
| Shift while rotating | Snap to 15 degree steps |
| Middle-drag | Pan |
| Mouse wheel | Zoom about the cursor |
| Home or F | Frame all islands |
| Ctrl+Z / Ctrl+Y | Undo / redo the layout change |
A status line along the bottom always names the gesture in progress and the keys that apply to it.