Guide: Develop Profiles for OrcaSlicer
This guide explains OrcaSlicer's profile system and how to create or maintain its shipped printer, filament and process profiles in a source checkout.
- High-level Overview
- File Structure and Templates
- Create or Update a Profile Bundle
- Vendor Meta File
- Printer Model Profiles
- Printer Variant Profiles
- Process Profiles
- Filament Profiles
- Setting IDs
- Filament IDs
- Testing Profile Changes
- Validate Profiles
High-level Overview
Three Presets Describe a Print
A profile, also called a preset, is a named collection of settings stored in a JSON file. Preparing a print brings together three kinds of preset:
| Preset | The question it answers | Typical settings |
|---|---|---|
Printer (machine) |
What hardware am I printing on? | Bed size, nozzle diameter, motion limits and machine G-code |
Filament (filament) |
What material am I printing with? | Temperatures, cooling, flow ratio and maximum volumetric speed |
Process (process) |
How should the part be printed? | Layer height, walls, infill, supports and print speeds |
For example, a user might select Orca 3D Fuse1 0.4 nozzle, Generic PLA @System and 0.20mm Standard @Orca 3D Fuse1 0.4. Changing the layer height belongs in the process profile; changing the material's temperature belongs in the filament profile. These settings are kept separate so the same printer can use many materials and quality levels.
Models, Variants and Bundles
A printer model (machine_model) describes a product, such as Orca 3D Fuse1. It lists the available nozzle variants and references the bed model and texture used in the 3D view. A printer variant (machine) is the actual printer preset used for slicing, such as Orca 3D Fuse1 0.4 nozzle. One model can have several variants.
A vendor bundle groups related profiles. It consists of a folder containing the profiles and a matching JSON meta file that lists them. Think of the meta file as the bundle's index: putting a new file in the folder is only half the job; you must also register it in that index.
OrcaFilamentLibrary is a shared bundle of generic and branded filament profiles. Printer bundles can use these materials and inherit their settings. You only need a printer-specific filament profile when you have material settings tuned for that printer.
Inheritance Reuses Settings
The inherits field names a parent profile. OrcaSlicer first resolves the parent's settings, then applies the child's values on top. Any setting omitted by the child keeps its inherited value. Parents can also inherit from other profiles.
A shared base holds settings for other profiles and is not selectable in the UI ("instantiation": "false"). A selectable preset supplies a configuration users can choose ("instantiation": "true"). Both can be parents of other profiles.
For example, several process profiles can inherit fdm_process_common. The common base holds shared settings, while each child supplies its own layer height and quality adjustments. Changing the common base affects every child that has not overridden that setting.
Printer and process profiles inherit within their vendor bundle. Filament profiles can also inherit from OrcaFilamentLibrary.
Compatibility Chooses Where a Preset Is Available
Inheritance and compatibility answer different questions: inherits says where settings come from; compatible_printers lists the printer variants where a filament or process preset can be used.
A global filament can serve many printers. When a printer-specific filament has the same alias as a global filament, OrcaSlicer uses the printer-specific one on its listed printers. The alias normally comes from the part of the name before @: Generic PLA @Orca 3D Fuse1 replaces Generic PLA @System on the supported Fuse1 variants. Other printers keep using the global profile.
How the Files Connect
Each box below represents a JSON file. Dotted arrows mean the meta file registers a profile; solid arrows show references through named fields. The example includes a vendor filament that inherits settings from a global filament.
flowchart TB
    subgraph Vendor["Printer vendor bundle"]
        Index["Vendor meta file"]
        Model["Printer model"]
        Machine["Printer variant"]
        MachineBase["Shared printer base"]
        Process["Process preset"]
        ProcessBase["Shared process base"]
        Filament["Printer-specific filament"]

        Index -.-> Model
        Index -.-> Machine
        Index -.-> MachineBase
        Index -.-> Process
        Index -.-> ProcessBase
        Index -.-> Filament
        Machine -->|printer_model| Model
        Machine -->|inherits| MachineBase
        Process -->|inherits| ProcessBase
        Process -->|compatible_printers| Machine
        Filament -->|compatible_printers| Machine
    end

    subgraph Library["OrcaFilamentLibrary"]
        LibraryIndex["Library meta file"]
        GlobalFilament["Global filament"]
        LibraryIndex -.-> GlobalFilament
    end

    Filament -->|inherits| GlobalFilament
The filament's inherits arrow reuses settings. Replacing the global fallback is a separate effect of sharing its alias and listing the target printers; that replacement does not require an inheritance relationship.
Two IDs Serve Different Purposes
| ID | What it identifies | Example |
|---|---|---|
setting_id |
One selectable preset | Two printer-specific presets of PolyLite PLA have different setting IDs |
filament_id |
One filament product, shared across its presets | Those PolyLite PLA presets share one filament ID |
The ID tool generates both values; see Setting IDs and Filament IDs for details.
File Structure and Templates
Edit resources/profiles/ in your OrcaSlicer source checkout. This is the source of the profiles distributed with the application. The examples use a fictional vendor, Orca 3D, and its Fuse1 printer, starting with a 0.4 mm nozzle.
resources/profiles/
├── Orca 3D.json                         # Vendor meta file (the index)
├── Orca 3D/
│   ├── machine/
│   │   ├── fdm_machine_common.json      # Shared printer settings
│   │   ├── Orca 3D Fuse1.json            # Printer model
│   │   └── Orca 3D Fuse1 0.4 nozzle.json # Selectable printer variant
│   ├── process/
│   │   ├── fdm_process_common.json      # Shared process settings
│   │   └── 0.20mm Standard @Orca 3D Fuse1 0.4.json
│   └── filament/                       # Optional printer-specific tuning
│       └── Generic ABS @Orca 3D Fuse1.json
├── OrcaFilamentLibrary.json             # Shared filament index
└── OrcaFilamentLibrary/
    └── filament/                       # Generic and branded materials
Each profile's filename is its name plus .json. Use the same name in the vendor meta file and in references from other profiles.
| File or profile | Name pattern | Example |
|---|---|---|
| Vendor meta file | <vendor> |
Orca 3D |
| Printer model | <vendor> <printer> |
Orca 3D Fuse1 |
| Printer variant | <vendor> <printer> <nozzle> nozzle |
Orca 3D Fuse1 0.4 nozzle |
| Filament | <product name> @<target> |
Generic ABS @Orca 3D Fuse1 |
| Process | <layer height> <quality> @<target> |
0.20mm Standard @Orca 3D Fuse1 0.4 |
A process quality name is usually Standard, Fine, Fast or Draft. A filament's target is often System, a printer model or a printer variant. The target suffix describes the intended use; compatibility is still controlled by the profile's fields.
Templates are in resources/profiles_template/Template/. Existing bundles are also useful examples, especially for printer hardware similar to yours. When adapting one, review its firmware, dimensions, motion limits and G-code instead of assuming that all settings transfer to your printer.
Tip
Use a short vendor name to keep filenames manageable. The paths in this guide use /; use the equivalent path separator for your operating system.
Common Profile Fields
Printer, filament and process JSON files use these fields. A machine_model is a separate metadata record.
| Field | Value |
|---|---|
inherits |
The parent's exact name, without .json or a directory path |
instantiation |
"false" for a shared base; "true" for a selectable preset |
from |
"system" for profiles distributed with OrcaSlicer |
compatible_printers |
Filament and process only: an array of full printer variant names, such as ["Orca 3D Fuse1 0.4 nozzle"] |
Write JSON field names in quotes and preserve the value types used by the templates, including the strings "true" and "false". A folder name or a suffix such as @System or @base does not create inheritance; use inherits to name the parent.
Set compatibility explicitly on selectable filament and process profiles. Use printer variant names, not model names or filenames. Printer vendor filaments require a non-empty list; the global library can use an empty list, subject to compatibility conditions and replacement by a printer-specific preset.
Create or Update a Profile Bundle
Choose the smallest change that meets your goal:
| Your goal | What to add or update |
|---|---|
| Support a new printer | A model, its printer variants, compatible processes and the vendor meta file |
| Add a nozzle size to an existing printer | The model's nozzle list, a printer variant, matching processes and any relevant filament compatibility lists |
| Add a generic material or filament product | Profiles and index entries in OrcaFilamentLibrary |
| Tune an existing material for a printer | A printer-specific filament profile in the appropriate library, with explicit compatibility |
| Adjust an existing preset | Its own overrides, or a shared base if the change should apply to all its children |
For a new printer, work through these steps:
- Choose the bundle and parents. Reuse the printer vendor's bundle if it exists. For a new vendor, create its folder and meta file. Identify or create the shared printer and process bases.
- Describe the hardware. Add the printer model, then one printer variant for each supported nozzle configuration. Make the variant's
printer_modelmatch the model name. - Add a usable process. Create a process for each variant and list that variant in
compatible_printers. Set the printer'sdefault_print_profileto the process's exact name. - Choose materials. Start with the global filament library. Add printer-specific profiles only for materials you have tuned, and set the printer's default filament to an available preset.
- Register the files. Add the new profiles, including shared bases, to the matching lists in the Vendor Meta File. Review names, paths and references together.
- Generate IDs and version the update. Run the ID tool, update the filament snapshot when filament entries or identities change, and bump the last component of each changed bundle's
version. - Validate and try the profiles. Run the profile checks, load the changed resources in OrcaSlicer, inspect a sliced model and test the settings on the target printer. When editing a shared base, test all affected variants.
For a filament-only change, use the relevant filament example, then complete registration, ID generation, versioning and validation. The JSON examples below show structure and selected settings; they are not complete, tested configurations for a real printer. Unless a section explicitly shows generated IDs, the examples omit them so you can run the tool after choosing your own names.
Vendor Meta File
Each bundle has a resources/profiles/<vendor>.json meta file next to its folder. OrcaSlicer reads this file to find the profiles to load. Register every profile, including non-selectable bases, in the appropriate list:
| List | Contains |
|---|---|
machine_model_list |
Printer models (machine_model) |
machine_list |
Printer variants and shared printer bases (machine) |
process_list |
Selectable processes and shared process bases (process) |
filament_list |
Selectable filaments and shared filament bases (filament) |
Each entry's name matches the profile's name. Its sub_path is relative to the vendor folder, not to resources/profiles/. For example, this is Orca 3D.json for the files shown above:
{
    "name": "Orca 3D",
    "version": "01.00.00.00",
    "force_update": "0",
    "description": "Orca 3D printer profiles",
    "machine_model_list": [
        {
            "name": "Orca 3D Fuse1",
            "sub_path": "machine/Orca 3D Fuse1.json"
        }
    ],
    "machine_list": [
        {
            "name": "fdm_machine_common",
            "sub_path": "machine/fdm_machine_common.json"
        },
        {
            "name": "Orca 3D Fuse1 0.4 nozzle",
            "sub_path": "machine/Orca 3D Fuse1 0.4 nozzle.json"
        }
    ],
    "process_list": [
        {
            "name": "fdm_process_common",
            "sub_path": "process/fdm_process_common.json"
        },
        {
            "name": "0.20mm Standard @Orca 3D Fuse1 0.4",
            "sub_path": "process/0.20mm Standard @Orca 3D Fuse1 0.4.json"
        }
    ],
    "filament_list": [
        {
            "name": "Generic ABS @Orca 3D Fuse1",
            "sub_path": "filament/Generic ABS @Orca 3D Fuse1.json"
        }
    ]
}
If you use only global filaments, leave filament_list empty; do not copy their entries into the printer bundle. Add them to OrcaFilamentLibrary.json when contributing to the global library itself.
When updating a bundle, increment the last component of its existing version, for example 01.00.00.00 → 01.00.00.01, so users receive the profile update. Preserve the other bundle metadata unless your change requires updating it.
Printer Model Profiles
A machine_model describes the printer product and its available variants. It lives in resources/profiles/<vendor>/machine/ and is registered in machine_model_list.
{
    "type": "machine_model",
    "name": "Orca 3D Fuse1",
    "nozzle_diameter": "0.4",
    "bed_model": "fuse1_bed.stl",
    "bed_texture": "fuse1_texture.svg",
    "model_id": "Fuse1",
    "family": "Orca 3D",
    "machine_tech": "FFF",
    "default_materials": "Generic PLA @System;Generic PETG @System"
}
For several nozzle sizes, use a semicolon-separated string such as "0.2;0.4;0.6;0.8" and add matching printer variants. Here, nozzle_diameter advertises the available sizes; the variant profile below sets the nozzle actually used for slicing. default_materials lists the model's default material choices, also separated by semicolons.
Models
bed_model and bed_texture refer to assets relative to the vendor folder. Keep the referenced STL and SVG files in that bundle; use a relative subfolder path if you organize assets in a subfolder such as model/. These assets describe the bed's appearance; the printer variant's printable_area defines its printable boundary.
The vendor folder can also hold a 240×240 px image named <machine_model_list.name>_cover.png, such as Orca 3D Fuse1_cover.png, for printer selection in the UI.
Printer Variant Profiles
A machine profile defines a selectable hardware configuration. It lives alongside the model in resources/profiles/<vendor>/machine/, but is registered in machine_list.
Start from a shared printer base such as fdm_machine_common. Put settings shared by your printers in that base and the settings specific to this variant in its own file:
{
    "type": "machine",
    "name": "Orca 3D Fuse1 0.4 nozzle",
    "inherits": "fdm_machine_common",
    "from": "system",
    "instantiation": "true",
    "nozzle_diameter": ["0.4"],
    "printer_model": "Orca 3D Fuse1",
    "printer_variant": "0.4",
    "default_filament_profile": ["Generic PLA @System"],
    "default_print_profile": "0.20mm Standard @Orca 3D Fuse1 0.4",
    "printable_area": ["0x0", "235x0", "235x235", "0x235"],
    "nozzle_type": "brass"
}
printer_model links this preset to the model record. inherits links it to its settings base; the model record is not that base.
printer_variant must exactly match an entry in the linked model's semicolon-separated nozzle_diameter list. The validator also checks that the variant's numeric diameters agree with this machine preset's nozzle_diameter. For example, "0.8HF" identifies a hardware variant with a 0.8 mm nozzle, while "0.4+0.6" describes a variant with two nozzle diameters.
Unlike the model's semicolon-separated nozzle list, a machine preset uses an array such as ["0.4"]. Preserve the value types used by the existing profiles and templates. The default filament and process names must resolve to presets available for this printer.
Process Profiles
Process profiles define print quality and behavior. They live in resources/profiles/<vendor>/process/ and are registered in process_list. There are no global process profiles shared across all printer bundles.
A shared base uses "instantiation": "false". A selectable quality preset inherits that base and sets its own values. This example sets a 0.20 mm layer height for the 0.4 mm printer variant:
{
    "type": "process",
    "name": "0.20mm Standard @Orca 3D Fuse1 0.4",
    "inherits": "fdm_process_common",
    "from": "system",
    "instantiation": "true",
    "layer_height": "0.2",
    "compatible_printers": ["Orca 3D Fuse1 0.4 nozzle"]
}
The name helps users recognize the quality level; it does not set the layer height. The layer_height field does that. Additional Fine or Draft profiles can inherit the same base and override their layer height, speeds and other quality settings.
Filament Profiles
Filament profiles hold material settings and are registered in a bundle's filament_list. Choose their location by who maintains the settings and what they apply to:
| Contribution | Location under resources/profiles/ |
|---|---|
| Generic material for all printers | OrcaFilamentLibrary/filament/ |
| Filament brand's products, including its printer-specific tunes | OrcaFilamentLibrary/filament/<brand>/ |
| Printer vendor's material tuning for its own printers | <vendor>/filament/ |
Important
Create a printer-specific filament profile only if you have tuned the filament for that printer. Otherwise use the global library: improvements to it benefit every printer that uses it.
Adding Filament Profiles to the Global Library
Generic filaments go in resources/profiles/OrcaFilamentLibrary/filament. A brand's filaments go in the brand's own subfolder, see Adding a Filament Brand. Inherit an existing base type if there is one.
This example adds Generic PLA-GF @System:
-
Create
Generic PLA-GF @System.json. Leavecompatible_printersempty so it is available for all printers, and leave outsetting_idandfilament_id. -
Add this entry to the existing
filament_listinresources/profiles/OrcaFilamentLibrary.json. Keep the other entries: -
Generate the IDs and update the snapshot (see Generating the ID):
The tool adds both IDs.
Generic(inherited from the base profile),PLA-GFandGeneric PLA-GFgive the IDOFkuMukj: -
Bump the version in
OrcaFilamentLibrary.jsonand validate the profiles.
Adding a Filament Brand
A filament brand, such as Polymaker, keeps all of its profiles in its own subfolder of the global library, and never adds profiles to a printer vendor's folder:
resources/profiles/
    └── OrcaFilamentLibrary/
        └── filament/
            └── Polymaker/
                ├── PolyLite PLA @base.json
                ├── PolyLite PLA @System.json
                ├── BBL/
                │   └── PolyLite PLA @BBL P1S 0.4 nozzle.json
                └── Qidi/
                    └── PolyLite PLA @Qidi Q2 0.4 nozzle.json
The profile for all printers sits directly in Polymaker. A profile tuned for a specific printer goes in a subfolder named after that printer's vendor folder, such as BBL or Qidi. Register all of them in OrcaFilamentLibrary.json, with the subfolders in sub_path, e.g. filament/Polymaker/BBL/PolyLite PLA @BBL P1S 0.4 nozzle.json.
Start with a non-selectable product base. Set filament_vendor to the brand and inherit the closest material base:
{
    "type": "filament",
    "name": "PolyLite PLA @base",
    "from": "system",
    "instantiation": "false",
    "inherits": "fdm_filament_pla",
    "filament_vendor": ["Polymaker"]
}
Then add the selectable profile for all printers. Inherit the product base and leave compatible_printers empty:
{
    "type": "filament",
    "name": "PolyLite PLA @System",
    "from": "system",
    "instantiation": "true",
    "inherits": "PolyLite PLA @base",
    "compatible_printers": []
}
Add a printer-specific profile only if you have tuned the filament for that printer. Keep the PolyLite PLA name, inherit PolyLite PLA @base, and list the printer variants in compatible_printers:
{
    "type": "filament",
    "name": "PolyLite PLA @BBL P1S 0.4 nozzle",
    "from": "system",
    "instantiation": "true",
    "inherits": "PolyLite PLA @base",
    "filament_max_volumetric_speed": ["18"],
    "compatible_printers": [
        "Bambu Lab P1S 0.4 nozzle"
    ]
}
On that printer, this profile replaces PolyLite PLA @System. Both are the filament PolyLite PLA, so this profile inherits the same filament_id, OF5CgdDq.
Register the base and all selectable profiles in OrcaFilamentLibrary.json, including any additional printer-specific profiles such as the Qidi example in the tree. Bump the library version, then generate the IDs and validate. Run the full check: a single-vendor run fails on these profiles, see Checking One Vendor.
Adding Filament Profiles to Printer Vendor Library
Printer vendors manage their own vendor folder, including its filament profiles in resources/profiles/<vendor>/filament. Filament brands don't add profiles here, see Adding a Filament Brand. Inherit a library base type if there is one, and set a non-empty compatible_printers.
This example tunes Generic ABS for Orca 3D Fuse1. Only the changed material settings and the intended printer need to be listed:
{
    "type": "filament",
    "name": "Generic ABS @Orca 3D Fuse1",
    "from": "system",
    "instantiation": "true",
    "inherits": "Generic ABS @System",
    "filament_flow_ratio": ["0.98"],
    "filament_max_volumetric_speed": ["12"],
    "compatible_printers": ["Orca 3D Fuse1 0.4 nozzle"]
}
These values illustrate an override; use values measured for your printer. Add other nozzle variants to compatible_printers only when the tuning applies to them too.
The profile keeps the Generic ABS name and inherits Generic ABS @System, so it can inherit the library's filament_id. It still needs its own generated setting_id. A vendor's own branded filament has a different product identity and needs its own filament ID; see Filament IDs.
Register the file in the printer vendor's filament_list, bump that bundle's version, then generate the IDs, update the snapshot and validate.
Setting IDs
Every selectable machine, filament or process preset ("instantiation": "true") needs a setting_id that is unique across all OrcaSlicer profiles. It is computed from the vendor folder, the profile type (filament, process or machine) and the profile name:
Don't write or copy a setting_id. Add your profiles without one and let the ID tool fill it in:
This works the same for new and existing vendors. The same run adds the filament_id of new filaments, and re-running it on an unchanged tree changes nothing. Add --vendor <Vendor> to limit it to one vendor, --setting-id to write only setting_id, or --dry-run to preview.
Important
- Base profiles (
"instantiation": "false") must not have asetting_id. - Renaming a preset changes its
setting_id. Run the tool again after a rename. - The IDs in this guide's examples are illustrative. The profile checks fail on a missing or wrong ID, so always run the tool.
Note
Bambu Lab (BBL) presets are the one exception: they keep their G* setting IDs from Bambu Studio. This covers setting_id only.
Filament IDs
filament_id identifies a filament product, such as PolyLite PLA or Generic PETG HF. All printer and nozzle variants of that product share one ID, in every vendor bundle. Printers with a filament system (Bambu Lab AMS, Creality CFS, the Qidi box, Klipper, Snapmaker) use it to match the spool in a slot to a filament preset.
How the ID Is Generated
The ID is a hash of three values, resolved through the inherits chain:
filament_vendor: the filament manufacturer (e.g.Polymaker), orGeneric. Do not substitute the printer brand just because a preset is tuned for its printer.filament_type: the material (e.g.PLA).- The filament name: the preset name up to the first
@, with surrounding whitespace removed.MyBrand PLA @Orca 3D Fuse1andMyBrand PLA@HSare bothMyBrand PLA.
filament_id = "OF" + base62_6( uuid5(namespace, "filament_product/<filament_vendor>/<filament_type>/<filament_name>") )
The result is always 8 characters, short enough for the AMS. The same product gets the same ID everywhere: Polymaker / PLA / PolyLite PLA is always OF5CgdDq.
Note
Bambu Lab filaments follow the same rule. For filaments that exist in both OrcaSlicer and Bambu Studio, OrcaSlicer maintains a mapping file between the two sets of IDs.
Important
Never write or copy a filament_id. Create the filament without one and let the ID tool add it.
Do I Need a New ID?
Only if users would see it as a different spool product.
| Situation | filament_id |
|---|---|
| Printer or nozzle variant of an existing filament | Same ID |
Vendor-tuned generic (e.g. Generic PLA for your printer) |
The library's ID: inherit Generic PLA @System and keep the Generic PLA name |
| Product lines (PLA, PLA Matte, PLA Silk, PLA HF) | A new ID for each |
| A new color | Same ID |
| Another diameter of the same product (1.75 mm, 2.85 mm) | A new ID; give it a distinct product name |
| High-speed tune for a different printer model | Same ID |
| High-speed preset offered next to the normal one on the same printer | A new ID (it needs its own name) |
Whether a preset sets filament_id or inherits it, the ID must match the preset's own vendor, type and name. inherits passes on settings, not identity: Flashforge ABS Basic @FF C5 inherits Generic ABS @System but sets its own filament_vendor, so it gets its own ID.
Warning
Printer-specific presets with the same filament_id must not share a printer in compatible_printers. Otherwise spool matching on that printer is ambiguous and the validate_filament_subtypes check fails. The global fallback is allowed because OrcaSlicer hides it on printers covered by a matching printer-specific preset, as described under Compatibility.
Generating the ID
Create the filament profile without a filament_id, then run:
python3 scripts/orca_id_tool.py --dry-run          # preview the IDs
python3 scripts/orca_id_tool.py --generate         # write filament_id and setting_id
python3 scripts/orca_id_tool.py --update-snapshot  # update scripts/filament_id_snapshot.json
./scripts/check_profile.sh                         # validate (.\scripts\check_profile.bat on Windows)
Commit the profiles together with scripts/filament_id_snapshot.json. The snapshot records each filament ID, its product identity and the bundle/filament-name pairs that use it, such as BBL/PolyLite PLA. Multiple printer-specific presets of that product in one bundle share a single entry. CI requires the snapshot to match the state derived from the profiles. Don't edit it by hand.
Add --vendor <Vendor> to limit --generate or --dry-run to one vendor, or --filament-id to write only filament_id. If you skip the tool, CI fails and prints the expected ID.
Renaming or Correcting a Filament
Renaming a filament or fixing its filament_vendor or filament_type changes its ID. When renaming, add the old preset name to renamed_from so existing projects and user presets still find it. This field is a string:
Then run --generate and --update-snapshot and commit the updated profiles and snapshot.
Caution
Old IDs are not forwarded. A printer slot or calibration record holding the old ID falls back to matching by filament type until the user selects the filament again. Only change a filament's identity to fix a real mistake.
Testing Profile Changes
The command-line validator reads your checkout's profile files directly. To inspect the same changes in the GUI, run a build or test installation that contains your edited resources/profiles/. Editing the source checkout alone does not update a separately installed copy of OrcaSlicer.
OrcaSlicer also keeps system profiles in its configuration folder. If an older cached copy hides the resources you are testing:
-
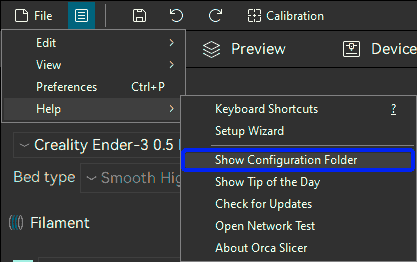
In OrcaSlicer, go to Help → Show Configuration Folder, then close OrcaSlicer.
-
Remove the
systemfolder from that configuration folder so OrcaSlicer reloads its system profiles.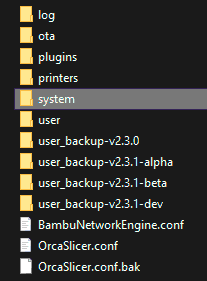
-
Restart OrcaSlicer, enable the printer if needed, and confirm that its variants, default process and compatible filaments appear as expected.
- Slice a representative model, inspect the preview and generated G-code, and test the settings on the target printer. Automated checks cannot establish print quality or verify the physical machine's limits.
Validate Profiles
Run the profile checks from the root of your OrcaSlicer checkout. They are the same checks CI runs on every pull request that changes profiles.
macOS and Linux:
Windows:
All checks run even if one fails, and the script exits with an error if any failed.
| Check | Catches |
|---|---|
extra_json_check |
Duplicate keys, vendor_name.json entries that don't match the files, bad filament compatible_printers, and setting_id or filament_id errors |
validate_system |
Profiles that fail to load, such as JSON errors, a missing parent profile, or a filament without a filament_id |
validate_slice |
Custom G-code errors, found by slicing a test cube on every printer |
validate_filament_subtypes |
Two filament presets with the same filament_id on one printer |
validate_custom |
Changes that break user presets made with earlier OrcaSlicer releases |
The script needs Python 3, plus curl and unzip on macOS and Linux.
The Profile Validator
The validate_* checks need OrcaSlicer_profile_validator. The script uses your local build if it finds one in a build* folder (Release preferred). Otherwise it downloads the nightly build that CI uses and caches it in .test/check_profiles/.
The nightly Linux validator is x86-64 only. On ARM64 Linux, build the validator yourself.
Options
check_profile.sh |
check_profile.bat |
Description |
|---|---|---|
-v, --vendor NAME |
-Vendor NAME |
Check one vendor, named exactly as its vendor_name.json (e.g. "Co Print") |
-p, --profiles DIR |
-ProfilesDir DIR |
Profile folder for the validator checks (default resources/profiles) |
--validator BIN |
-Validator BIN |
Use this validator binary (or set ORCA_PROFILE_VALIDATOR) |
--download |
-Download |
Use the nightly validator even if a local build exists |
--refresh |
-Refresh |
Download the validator and fixtures again |
--work-dir DIR |
-WorkDir DIR |
Folder for downloads and logs (default .test/check_profiles) |
-l, --log-level N |
-LogLevel N |
Validator log level (default 2) |
-h, --help |
-Help |
Show help |
To run only some checks, name them after the options: ./scripts/check_profile.sh validate_system validate_slice.
Tip
On Windows, if you hit the 260-character path limit, set -WorkDir to a short folder such as D:\t.
Checking One Vendor
A vendor run is faster, but CI checks the whole tree:
extra_json_checkstill checks ids across all vendors, so it can fail on another vendor's files.validate_sliceis skipped for vendors with no printers, such asOrcaFilamentLibrary.- The validator checks fail with
references unknown compatible_printerswhen a library profile lists printers of a vendor that isn't being checked, because only that vendor's printers are loaded.
Run the full check before opening a pull request.
Reading the Results
The run ends with a summary:
==> summary
    PASS  extra_json_check
    PASS  validate_system
    PASS  validate_slice
    PASS  validate_filament_subtypes
    PASS  validate_custom

All checks passed. Logs: /path/to/OrcaSlicer/.test/check_profiles/logs
A failed check shows FAIL and the path of its log. Logs are saved in .test/check_profiles/logs/<check>.log. On failure the script also writes .test/check_profiles/pr_comment.md, the same report CI posts on the pull request.
Running a Check on Its Own
To debug a check outside the script, run its command directly:
python3 scripts/orca_extra_profile_check.py                    # extra_json_check
python3 scripts/orca_id_tool.py --check                         # filament_id part of extra_json_check
OrcaSlicer_profile_validator -p resources/profiles -l 2         # validate_system
OrcaSlicer_profile_validator -p resources/profiles -s -l 2      # validate_slice
OrcaSlicer_profile_validator -p resources/profiles -l 2 -f      # validate_filament_subtypes
Add --vendor "Orca 3D" to the Python script, or -v "Orca 3D" to the validator, to check one vendor. orca_extra_profile_check.py also has two checks CI doesn't run: --check-materials and --check-obsolete-keys.