Image
Important
NEW FEATURE: Image
Available in: Nightly builds or Releases greater than 2.4.2.
Image puts a colour picture on a model: a logo on a lid, a photograph on a plaque, a label on a bottle. The surface keeps its shape - nothing is raised or engraved - and the picture is printed by changing filament across it.
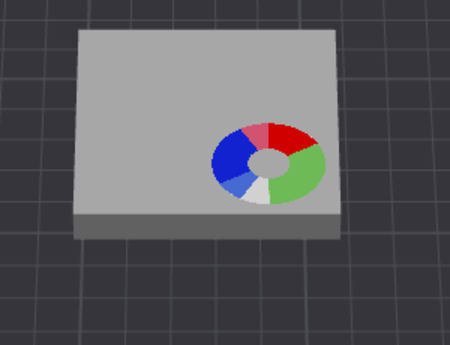
A twelve-hue colour wheel placed on a flat plate. The surface is not moved at all; what you see is each colour in the picture matched to the nearest of the four filaments loaded, which is why twelve segments come out as four colours and two blends.
It is the Texture Displacement engine with the relief turned off. Everything here can also be done from that tool by setting Depth to zero and ticking Colours; this one trades the layer stack, the blend modes and the depth controls for a single picture and a short path to it. Reach for Texture Displacement instead when you want relief as well, or more than one image on the same model.
- Quick start
- Choosing the picture
- Placing it
- Correcting the colours
- Removing the background
- How sharp it comes out
- Applying
- Troubleshooting
Quick start
- Select an object and open Image from the toolbar above the 3D view.
- Click the picture tile and choose an image, or drag one from a file manager straight onto the 3D view.
- Click the model where the picture should go. One click takes the whole face.
- Set Size, and Rotation if it needs lining up with an edge.
- Press Apply.
Note
The picture is printed in the filaments you have loaded, so a two-colour logo needs two filaments on the plate and a photograph needs as many as you can give it. A single-filament printer can still place a picture, but everything in it will print in that one filament.
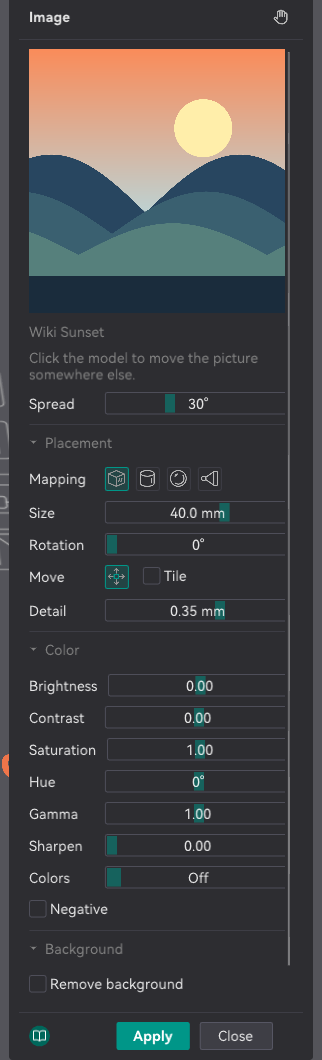
The panel, top to bottom: the picture and where it goes, then Placement (how it is laid on, how big, how sharp), Color (the corrections applied before your filaments are matched to it) and Background (what to leave unprinted). Apply writes the result into the model.
Choosing the picture
Click the tile at the top of the panel to open the picker. It holds the same library the texture tool uses: the shipped images, and your own under My textures. Importing a file copies it into your own folder, where application updates cannot overwrite it.
The picture must be in colour. A greyscale image is a height map, with nothing to print in a second filament, and the panel says so rather than letting you apply it.
A picture with transparency is understood: the transparent parts are left unprinted and the object's own colour shows through. That is usually what you want from a logo exported as a PNG, and it needs no setting.
You can also drag an image file from your desktop onto the 3D view. A dashed frame appears over the canvas while the file is over it; dropping imports the image into your library and loads it, so it is there next time too.
Placing it
Click the model and the picture lands there. The click spreads out from the point you hit across the surface, stopping at the first fold sharper than Spread - so on a flat side, a cube face or a panel, the single click is the whole gesture. Lower Spread to keep it to one face of a faceted model, raise it to let it run around a gentle curve. Clicking somewhere else moves it.
| Control | What it does |
|---|---|
| Mapping | How the flat picture is laid onto the surface. Flat projects it straight on, which is right for a face or a flat side; Around wraps it around the area for a mug or a tube; Ball wraps it in both directions for a dome; From view throws it on from where you are looking, like a slide projector |
| Capture current view | With From view, re-takes the direction from the camera. Line the view up with the surface first - faces turned away from you stretch |
| Size | How wide the picture is on the model, in millimetres |
| Rotation | Turns it on the surface, for lining it up with an edge |
| Move on the model | Replaces clicking with a handle you drag: the flat panel moves it freely, the arrows move it along one axis |
| Tile | Repeats the picture over the area instead of placing one copy. Off by default, because a photograph or a logo goes on once |
Correcting the colours
These sliders change the picture before it is matched to your filaments, and that is the point of having them here rather than leaving them to an image editor: your filaments are a fixed, arbitrary set, and a small correction is often what lets a picture meet them.
| Slider | What it does |
|---|---|
| Brightness | Lightens or darkens the whole picture |
| Contrast | Pushes light and dark apart. Raise it when a photograph prints as mud, lower it when everything collapses into the lightest and darkest filament |
| Saturation | How strong the colours are. At 0 the picture is grey and prints in your greys and blacks; raising it pushes each area towards a purer filament |
| Hue | Turns every colour around the colour wheel without changing how light it is. If you have orange loaded but no red, a small turn puts the reds onto the orange |
| Gamma | Lifts or drops the midtones, leaving the brightest and darkest parts alone |
| Sharpen | Crisps up the edges. Worth more here than in a photograph: a soft edge between two colours quantizes into a ragged band of both, and sharpening first makes it land in one place |
| Colours | Reduces the picture to at most this many colours before your filaments are matched to it. The colours chosen are the ones the picture is actually made of, not an even split of the range, so a tartan keeps its own greens and reds. Off leaves it alone |
| Negative | Prints the picture inverted, light for dark and each colour for its opposite |
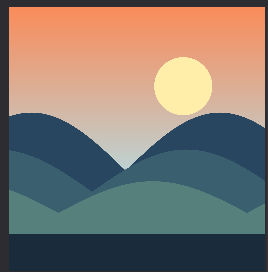
Colours off: the picture keeps every shade it arrived with, and the sky is a smooth gradient.
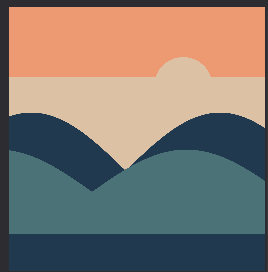
The same picture reduced to four. The gradient collapses into flat bands and the sun merges into the sky - which is what printing it in four filaments was going to do anyway, so it is better to see it here and judge it.
Reset all puts every correction and the background back to where they started. Where you placed the picture and how big it is are not touched.
Tip
Set Colours to 2 for a logo that should be two flat colours, 4 or 5 for a poster, and leave it off for a photograph. It caps what the picture uses; how many filaments the result actually needs can still be fewer, if two of the chosen colours match the same one.
Removing the background
A logo usually arrives on a white card, and printing that card is rarely what you want. Remove background leaves it unprinted, so the object's own colour shows through instead of a slab of white.
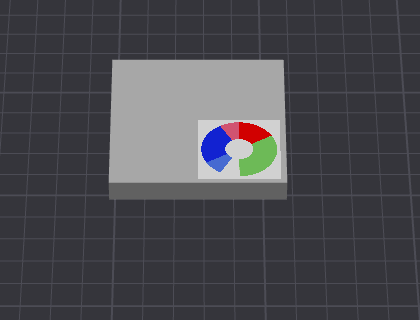
Without it, the card the wheel was drawn on is printed too - the white square around the disc is filament, not the plate showing through.
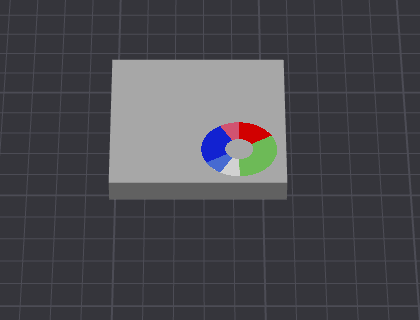
With it on, only the coloured segments are printed. Note that the hole in the middle of the wheel goes with it: it is the same white, and the key removes a colour, not a region. Lower Tolerance, or pick the background with the dropper, when that is not what you want.
By default the colour removed is taken from the four corners of the picture, which is right for nearly every logo. When it is not:
- Click the swatch to choose a colour by hand.
- Or press the dropper and click the background, either in the preview or on the model itself.
- Corners goes back to taking it from the corners.
Tolerance is how different from that colour still counts as background. Raise it when a shadow or a gradient is left behind, lower it when it starts eating into the picture.
How sharp it comes out
Each triangle prints in a single filament, so the mesh under the picture has to be finer than the detail you want out of it. Detail is the triangle size the apply refines to, in millimetres, and it is the one number that decides how crisp an edge between two colours can be.
Smaller costs triangles fast: halving it needs roughly four times as many, and every one of them costs slicing time, memory and file size for the rest of the project's life. Aim a little finer than the smallest feature you want to be legible, not as fine as the picture can go.
The panel warns, before you apply, when the detail you have asked for needs far more triangles than the budget allows. The apply still runs, but it simplifies back down to the budget and the picture comes out softer than the slider promised.
Applying
Apply refines the mesh under the picture and writes the colours into the object's Color Painting data. From there it slices, previews and prints exactly like hand-painted colour, and can be touched up with that tool afterwards.
- The whole apply is a single undo step.
- Stop ends a long one early; whatever it had already finished stays on the model, and can be undone.
- Colour already on the model is kept, and this picture goes on top of it. Applying a second picture somewhere else does not disturb the first.
- Close leaves the tool. Your picture, where you put it and every correction stay with the model and are saved in the project.
Warning
The surface is not moved, but the mesh under the picture is replaced by a finer one. That is what gives the colour something to print on. Anything you had painted there by hand - supports, seams, fuzzy skin, colour - is carried across, but a model you had carefully simplified will not stay simplified.
Troubleshooting
| Symptom | Likely cause | Fix |
|---|---|---|
| Apply is greyed out | No picture placed yet, or the image is greyscale | Click the model to place it; choose a colour picture |
| The picture prints in the wrong colours | Your filaments are the palette, and the nearest one to each colour is what you get | Load filaments closer to the picture, or turn Hue and Saturation until it meets the ones you have |
| It prints as mud | A low-contrast photograph spread over too few filaments | Raise Contrast, and set Colours to the number of filaments you actually have |
| The edges are ragged | The mesh is too coarse for the detail | Lower Detail, and heed the triangle warning above the button |
| A white box around the logo | The background was not removed | Tick Remove background, and raise Tolerance if a fringe is left |
| Part of the picture disappeared | Tolerance is high enough to match colours inside the picture too | Lower it, or pick the background colour with the dropper instead of the corners |
| The picture stretches on part of the area | From view on faces angled away from the camera | Re-capture from a better angle, or use Around or Ball |
| One click took far too much of the model | Spread is high enough to run past the fold you expected it to stop at | Lower it and click again |