Texture Displacement
Important
NEW FEATURE: Texture displacement
Available in: Nightly builds or Releases greater than 2.4.2.
Texture Displacement paints a texture onto a model and turns it into real relief - knurling you can grip, brickwork you can feel, a logo engraved into a lid.
The key idea is that it is not a print-time effect. Fuzzy skin perturbs the toolpath while slicing and leaves the model untouched; texture displacement rewrites the mesh. Once baked, the relief is ordinary geometry: it slices, previews, exports and measures like any other shape, and the slicer has no idea a texture was ever involved.
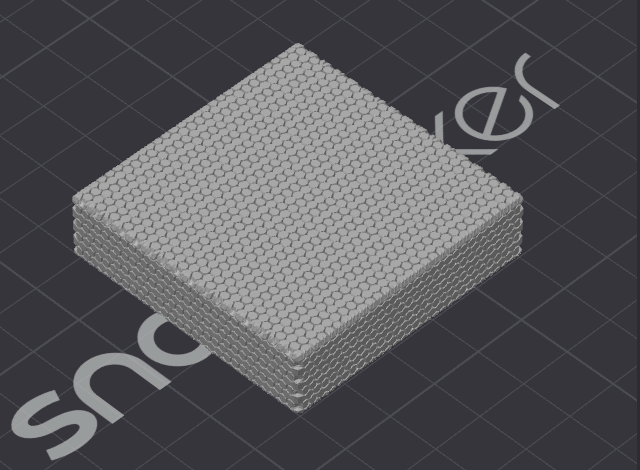
A 50 mm plate with the built-in Hexagons height map baked into it: 12 triangles in, 206 k out, and from here on it is just a mesh.
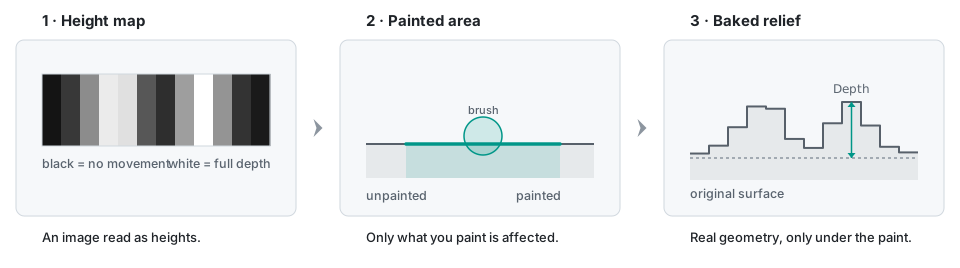
Three things decide what you get, and every control on the panel belongs to one of them:
| What it decides | Controls | |
|---|---|---|
| Where | Which part of the surface is affected | The paint tools. Nothing outside your paint is touched |
| What | The shape of the relief | The texture image, Depth, Tile size, Midlevel and the rest of the layer settings |
| How finely | How much of that shape the mesh can actually hold | Resolution and Budget |
Getting the first two right and the third wrong is the most common disappointment: a beautifully set up texture baked onto too coarse a mesh comes out as soft bumps. Baking explains how to avoid it.
- Quick start
- The panel
- Standard and Pro
- Painting the area
- Seeing what you will get
- Textures
- Stacking layers
- Shaping the relief
- Mapping
- Colours
- Baking
- Recipes
- Troubleshooting
- Limitations
Two more pages cover the parts with their own panel: the UV Editor, used by the Unwrap mapping, and Pro Mode, which exposes the mesh preparation steps.
Quick start
- Select an object and open Texture displacement from the toolbar above the 3D view. A layer is added for you.
- Click the layer's image and pick a texture - Knurl is a good first one.
- Paint the area you want it on, or press Select whole model.
- The relief appears as you work. Set Depth to how far it should stand proud, and Tile size to how big one copy of the pattern should be. Both are in millimetres, on the model.
- Press Bake.
That is the whole loop. Everything else is refinement.
Tip
Nothing is permanent until you bake, and a bake is a single undo step. Explore freely.
The panel
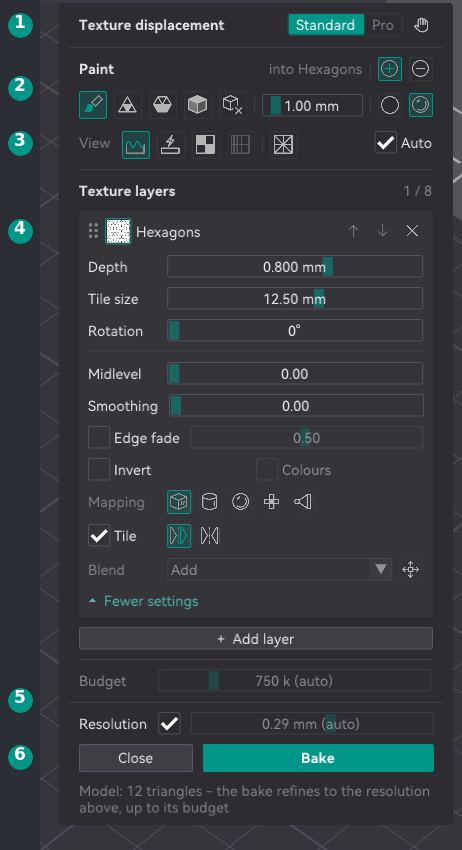
- Standard / Pro - Pro adds the mesh preparation controls.
- Paint tools - how you mark the area. The right mouse button does the opposite of the mode you are in.
- View - Fast while you tune, Normal to see what Bake will produce.
- The layer - its image, its paint and its settings. Up to 8 of them stack like image-editor layers.
- Resolution and Budget - how fine the mesh is made, and how many triangles that may cost.
- Bake - turns the preview into real geometry. Close leaves without baking.
Dock panel / Undock panel at the top of the panel pins it to the side of the 3D view or lets it float freely over it. Whichever you choose, leaving the tool keeps your paint, layers and settings with the model.
Standard and Pro
| Mode | What it shows | Use it when |
|---|---|---|
| Standard | Painting, layers, mapping, Bake | Almost always |
| Pro | The same, plus subdivision, remeshing and result smoothing as separate steps | You want to prepare the mesh once and then try several textures on it, or the automatic choice is too generous with triangles |
A height map can only move vertices that already exist, so a model needs enough of them before it can show any detail. Standard mode does that as part of Bake, at the resolution in its footer. Pro mode hands you the same machinery as separate buttons - see Pro Mode.
Painting the area
Paint marks where a layer applies. Every layer has its own paint, and what you paint goes into the active layer - the highlighted one in the list.
| Control | What it does |
|---|---|
| Paint | Adds to the active layer where you click or drag. The right mouse button erases |
| Erase | Removes it. The right mouse button paints |
| Brush | Free-hand. Brush size sets the radius; Circle paints everything under the brush as seen from the camera, Sphere paints only within a ball around the cursor, which is what you want on a curved or folded surface |
| Face | Clicks individual triangles. Precise on a low-poly model, tedious on a dense one |
| Connected area | Flood-fills from the click. Angle threshold stops the fill at edges sharper than the given angle, so one click can take a whole face of a box but not the box |
| Select whole model | Paints every face with the active layer |
| Erase whole model | Clears the active layer's paint everywhere |
Hold Ctrl and drag to move the camera without painting.
Tip
The paint boundary is where the relief meets the bare surface, and by default it steps down to it. Edge fade on the layer softens that into a ramp - see Shaping the relief.
Seeing what you will get
The View row decides what the 3D view shows. The first four are alternatives, Wireframe is an independent toggle.
| View | Shows | Notes |
|---|---|---|
| Normal | The real displaced geometry - exactly what Bake produces | Rebuilds in the background, so it lags on a big patch |
| Fast | A shaded approximation of the active layer only, with no geometry movement | Cheap, and the one to work in |
| Checker | A test grid over the unwrap. Squares stay square where the unwrap does not stretch | Only with the Unwrap mapping |
| Distortion | A blue-to-red heatmap of how much the unwrap stretches | Only with the Unwrap mapping |
| Wireframe | The mesh edges, on top of whichever view is active | A toggle, not an alternative |
Work in Fast while you drag sliders, then switch to Normal before you commit. The two can differ: Fast shows one layer, ignores how layers blend, and approximates the shading.
Auto (on by default) rebuilds the Normal view whenever anything changes. Turn it off on a heavy model and it only rebuilds when you release a slider or finish a stroke.
Textures
A texture is a greyscale image read as heights - white lifts the surface by Depth, black leaves it alone.
Click a layer's image to open the picker. Built-in ships 43 seamless height maps, all of which tile without a visible join:
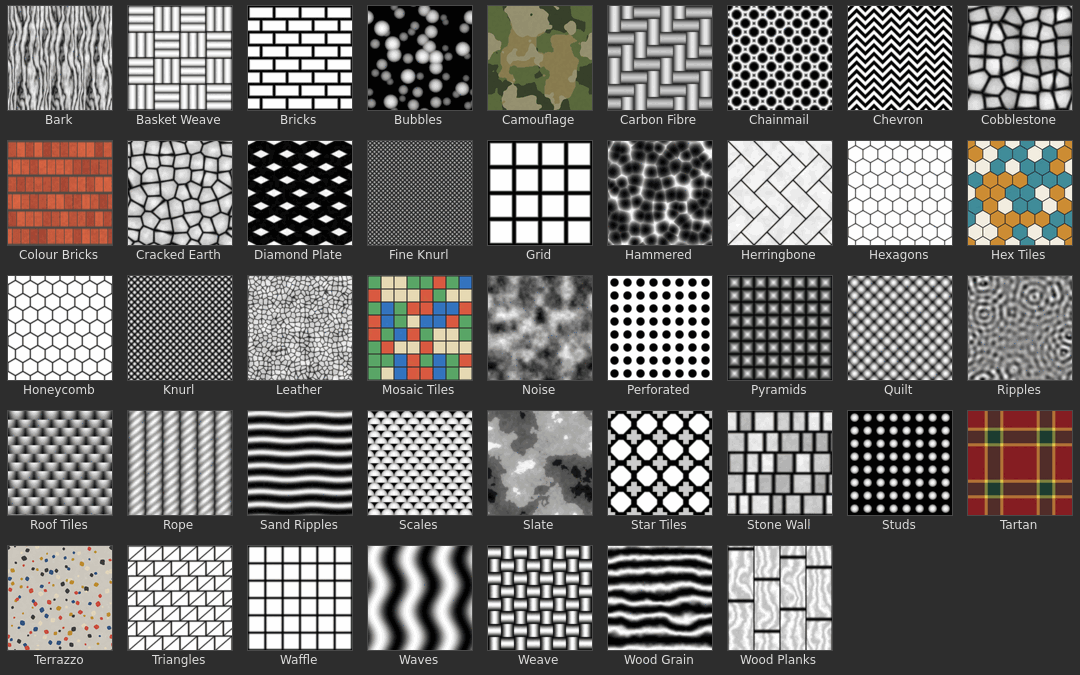
My textures, below them in the picker, holds your own. Import a PNG, JPG or BMP and it is converted to a height map and copied into your own texture folder, where application updates cannot overwrite it. Hover one of your own to remove it.
What makes an image work well as a height map:
- Seamless, if you are going to tile it. A photograph with uneven lighting shows a grid of joins.
- Full range. A washed-out image uses a fraction of the available depth; stretch its contrast first.
- Flat lighting. Shadows in a photo read as depth, so a lit photo of a brick wall engraves its own shadows.
- Not too fine. Detail smaller than the mesh resolution cannot be printed and only costs triangles. See Baking.
Tip
Changing a layer's image keeps its paint, depth and tiling, so you can audition textures without setting anything up again.
Stacking layers
Up to 8 layers stack, each with its own paint, image and settings. They combine in list order, like layers in an image editor: Move up is applied earlier, Move down later.
Where two layers overlap, the upper one's Blend mode decides what happens:
| Blend | Effect | Typical use |
|---|---|---|
| Add | Piles this relief on top of what is below | Scratches or noise over a base pattern |
| Subtract | Carves this relief out of what is below | Stamping a smooth logo into a knurled area |
| Multiply | Scales the relief below by this one | Masking - fade a pattern out where this layer is dark |
| Divide | Amplifies the relief below where this one is dark | Rare; it is capped at 20× so it cannot blow up |
The lowest painted layer is the base layer: it has nothing beneath it, so it always adds, and the panel says so rather than offering a control that would do nothing.
A layer you have not painted is marked not painted and is skipped by Bake - the note under the Bake button names them.
Shaping the relief
The three controls almost every layer needs are on the layer itself; More settings opens the rest.
| Control | What it does |
|---|---|
| Depth | How far white lifts the surface, in millimetres |
| Tile size | How wide one copy of the texture is on the model. Smaller repeats more often and makes the detail finer. With Tile off, this is the size of the single copy |
| Rotation | Turns the texture on the surface, for lining a pattern up with an edge |
| Smoothing | Blurs the image before it is used. Rounds off hard steps and removes speckle from a noisy photo, at the cost of fine detail |
| Edge fade | Flattens the relief towards the edge of the painted area so it blends into the bare surface. The slider sets how far in the fade reaches |
| Invert | Turns the relief inside out - the same as using a negative of the image |
| Tile | Whether the texture repeats. Repeat tiles it plainly, Mirrored repeat flips every other tile so edges meet seamlessly. Off places one copy, like a decal |
Midlevel decides which grey means "stay where you are", and it is what turns one image into both an embossing and an engraving tool:
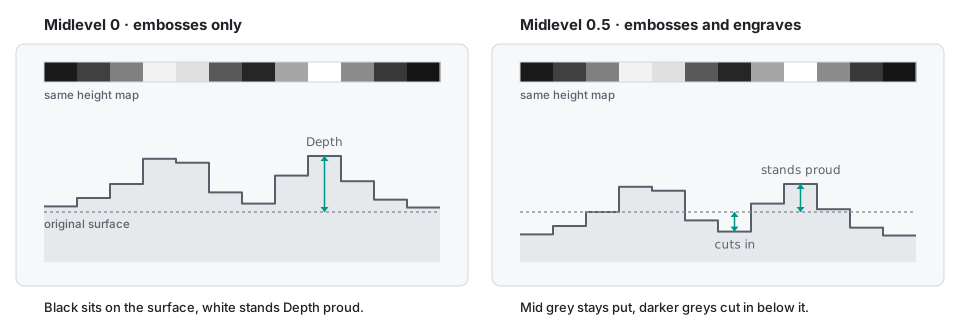
At 0 - the default - the relief only ever rises: black sits on the original surface and white stands Depth proud. At 0.5, mid grey stays put, lighter greys rise and darker greys cut in.
Warning
What cuts in has to fit. Inside a sharp concave corner, or through a thin wall, a deep inward cut can pass through the other side of the part. The panel warns when Depth is large and Midlevel is above 0; keep Depth well under the wall thickness there.
Mapping
Mapping is how the flat image is wrapped onto the curved, folded surface you painted. It is the setting that decides whether a pattern crosses an edge cleanly.
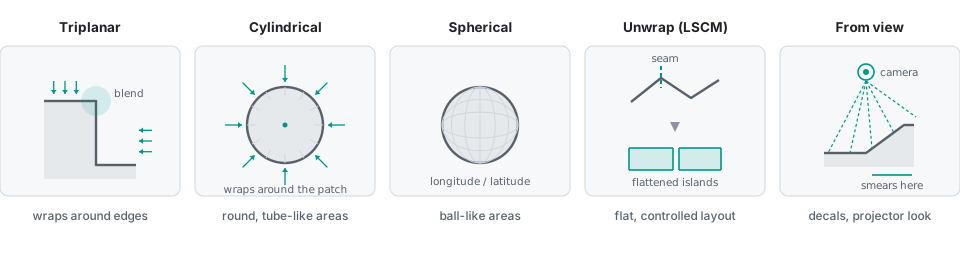
| Mapping | Use it for | What to know |
|---|---|---|
| Triplanar (blended) | The default; anything that wraps around edges | Projects from all three axes and blends between them, so there is no hard seam at a corner - but the pattern cross-fades in a band right at the edge |
| Cylindrical | Grips, knobs, anything tube-like | Wraps around the painted area's own centre |
| Spherical | Domes and balls | Wraps around the centre in both directions |
| Unwrap (LSCM) | A pattern that must run continuously and evenly | A real unwrap, cut at sharp edges, laid out in the UV Editor where you can arrange it by hand. The only mapping with no stretching surprises - and the only one that needs work |
| From view | Decals and one-off placements | Projects onto the painted area from where you are looking. Surfaces angled away from you smear |
From view has its own controls: Capture current view re-takes the direction from the camera, Project only on visible repaints the layer with exactly the faces the camera can see (it replaces the layer's paint rather than adding to it), and Projection frame opens a semi-transparent window you drag over the 3D view like a slide projector's gate - Apply projection frame makes its border the hard edge of the projection, and Clear returns to the plain projection.
Adjust placement replaces painting with a handle on the model: drag the flat panel to move the texture freely, or an arrow to move it along one axis. Paint something first - the handle anchors to the painted area.
Colours
A colour image can drive the print's colours as well as its relief. The Colours checkbox is only available on a layer whose image is in colour - a greyscale height map has nothing to apply.
With it on, each colour in the texture is matched to the nearest of the filaments loaded on the plate. Anything you did not paint keeps the object's own filament. At bake time the result is written into the object's Color Painting data, so it slices, previews and prints exactly like hand-painted colour, and can be touched up with that tool afterwards.
| Control | What it does |
|---|---|
| Mix filaments | Interleaves two filaments to fake the colours in between, so a few filaments can cover a photo or a gradient. An image of flat colours prints the same either way |
| Mix by | Layers alternates the two between print layers - smooth on upright walls, invisible on flat-facing tops where a whole layer is one band. Surface uses a fine checkerboard, which works at any angle but can read as texture. Automatic uses layers on upright faces and the nearer single filament on flat-facing ones |
| Denoise | Cleans up single stray triangles of the wrong colour. Raise it if the result looks speckled, lower it if small features are being swallowed |
A line under the controls reports how many printable colours your current filaments produce.
Note
Colour edges are only as sharp as the triangles along them, because each triangle prints in one filament. Pro mode's Colour detail refines the mesh where colours meet - nothing else refines there, since the surface is flat across a change of colour.
Baking
Bake turns the preview into geometry. Two controls in the footer decide how much of the texture survives the trip.
Resolution is the triangle size the bake refines the painted area to. It has to be smaller than the detail you want out of the texture:
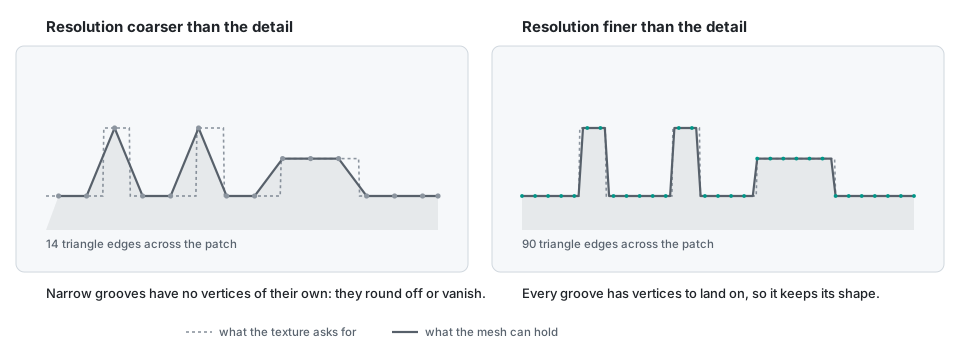
Leave Auto ticked and the resolution follows the size of the model, which is right for most parts. Untick it when the texture is much finer or much coarser than the part it sits on.
Budget is how many thousand triangles the bake may spend on the painted area. Relief already baked elsewhere on the model is kept on top of that, so a second bake somewhere else gets the same budget as the first.
The budget is the ceiling and the resolution is the demand, so the panel warns you before the bake when the demand is far over the ceiling. The bake still runs, but it simplifies back down to the budget and the detail goes with it. Raise the budget, or make the resolution coarser.
Important
Resolution is a triangle size in millimetres, so a smaller number means a finer mesh - and halving it asks for roughly four times the triangles. Every triangle then costs slicing time, memory and file size for the rest of the project's life. Aim a little finer than the smallest feature you actually want to feel, not as fine as the image can go.
Bake runs in the background and the button reads Baking…; Stop ends it early, keeping whatever was finished. Afterwards:
- The relief is part of the mesh, and the whole bake is one undo step.
- The paint of each baked layer is cleared - those triangles no longer describe the same unbaked surface. The layers, their textures and their settings stay, so you can carry on somewhere else with them.
- Colours land in the object's Color Painting data.
Recipes
Three worked examples to start from. All of them assume Standard mode.
A knurled grip on a round handle
- Paint the band you want to grip - Connected area with a low angle threshold usually takes it in one click.
- Texture Knurl, mapping Cylindrical.
- Tile size 4 mm, Depth 0.35 mm, Midlevel 0.
- Untick Auto and set the resolution to about 0.12 mm - a knurl ridge is a few tenths of a millimetre wide, and the triangles have to be smaller than that.
- Bake.
An engraved logo on a flat face
- Import the logo as a texture - a white shape on black to start with.
- Paint the face, mapping From view, looking straight at it. Press Capture current view.
- Turn Tile off so you get one copy, and size it with Tile size.
- Depth 0.4 mm. The logo now stands proud; to sink it into the face instead, set Midlevel to 0.5 and tick Invert.
- Use Adjust placement to slide it into position, then bake.
Wood grain over a whole model
- Select whole model, texture Wood Grain, mapping Triplanar.
- Tile size 40 mm - grain wants to be much larger than the detail it contains.
- Depth 0.25 mm, Smoothing 0.2 to take the harshness out.
- Leave the resolution on Auto and check the triangle warning before baking; a whole-model bake is the expensive case.
Troubleshooting
| Symptom | Likely cause | Fix |
|---|---|---|
| Nothing is painted yet when pressing Bake | Nothing painted, or the UV editor's seam tool is on and strokes are marking seams instead | Paint the area, or turn Mark seams off in the UV pane |
| A layer had no effect | It is not painted - the note under Bake names skipped layers | Make it active and paint it |
| Relief came out soft and rounded | Resolution too coarse for the pattern, or the budget forced a simplification | Set a finer resolution (a smaller millimetre value), raise the budget, and heed the warning above Bake |
| Relief looks harsh or speckled | The image is noisy, or has hard steps | Raise the layer's Smoothing, or Smooth result in Pro mode |
| The pattern cross-fades in a band at a sharp edge | Inherent to Triplanar | Use Unwrap and mark a seam along that edge |
| The pattern smears on part of the area | From view on faces angled away from the camera | Re-capture from a better angle, or use another mapping |
| The relief punched through the wall | High Midlevel with a large Depth on a thin wall | Reduce Depth, or Midlevel back to 0 |
| Triangle count exploded | Resolution far finer than the feature size | Coarsen the resolution; halving it costs 4× |
| Colours look speckled | Detail finer than the mesh can carry | Raise Denoise, or lower Colour detail in Pro mode |
| The preview does not match the bake | Fast view shows only the active layer and approximates | Switch to Normal before judging |
| Paint vanished after another tool | Simplify, Remesh or Subdivide replaced the geometry | Paint again, and do mesh work before painting |
Limitations
Important
Paint, layers and their settings live with the model in memory but are not yet stored in project files. Bake before saving a .3mf, or the relief will not be there when the project is reopened. Baked geometry and baked colours are ordinary model data and save normally.
- Anything that replaces the geometry drops unbaked paint - Simplify, and Pro mode's Subdivide and Remesh. Relief that is already baked in is unaffected.
- Island placements are tied to the current unwrap. Repainting or changing the seam angle re-cuts the pieces and discards placements made by hand before it.
- Fast view is an approximation, and shows only the active layer.
- Relief cannot exceed what the mesh can hold. There is no level of detail below the resolution the budget can pay for, however the sliders are set.